
Learn How Adobe Bridge Will Save You Time and Streamline Your Workflow
- Deena Englard

- Jun 24, 2021
- 3 min read
When I get tired and frustrated with Finder's image-preview (read: hitting spacebar) lag time, I switch over to Adobe Bridge. If you have folders with lots of large visual files that you preview regularly, then Adobe Bridge is for you. Bridge is a powerful file browser with many nifty tools including previewing and searching file metadata such as the creation date, the camera settings and the file's pixel dimensions (you can learn more about metadata here).
It will also save you a ton of time. Here’s how:

1. Fast Image Previews
Say goodbye to the preview lag-time of Finder and Windows Explorer. In Bridge, image thumbnails load almost instantly. You can adjust thumbnail sizes, move the preview panel around and zoom on-demand in order to quickly and easily spot similar images and sort them appropriately.
When you select multiple images simultaneously, they preview side by side for quick comparison. This way you can easily decide which image from a set of very similar photos you want to keep and which ones you can ignore, by rating your favorite (more on this below).

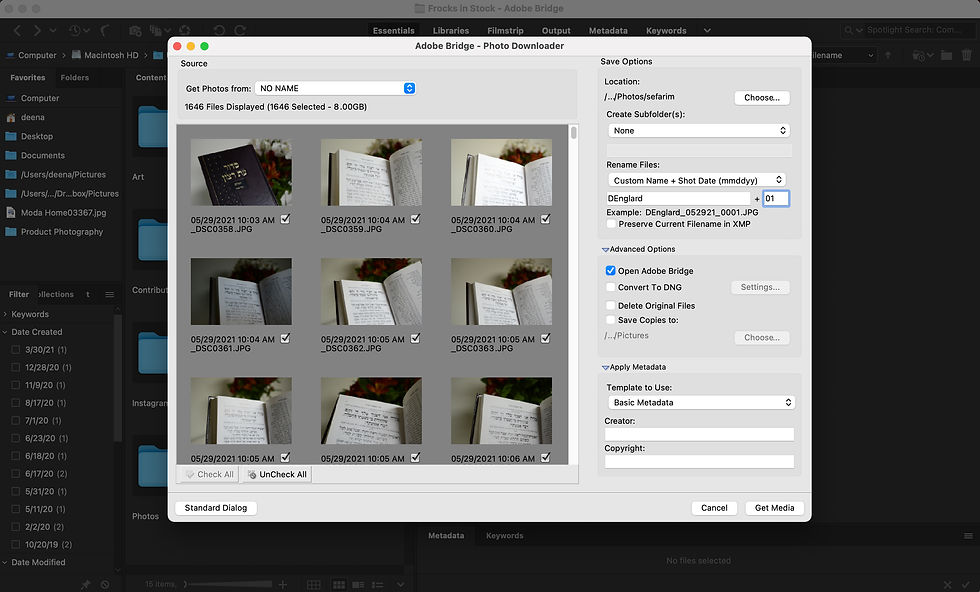
2. Customizable Importing
Those generic file names your camera generates for you? Instead, automatically rename files based on your choice of a custom name, date and file number (or whatever specification you prefer) when you batch-import your photos through Bridge. This way all of your files are consistently the way you like them. You can even create, name and populate a new folder, all from within the Bridge import window.
Remember to check the “Open Adobe Bridge” box in the Advanced Options section to automatically open a new Bridge window with your folder as soon as they’re finished importing, so that you don’t have to spend time navigating to it.
3. One Word: Filters
This is a tremendous time-saver.
With Adobe Bridge you can rate any file or folder on a scale of one through five and with one of five colors. Both of these attributes are filterable, individually and simultaneously.
During a photoshoot, photographers generally take multiple shots of every setting to make sure you have every image you need. This is great in case some images are blurry or out of focus or the angle doesn’t work, but can be overwhelming to browse through. It leaves you with hundreds of photos when all you need are those few perfect shots for your design.
In practice, my first step after any photoshoot is to open the images in Bridge and rate them. I prefer to use four stars for the best images, three stars for the runner-ups and five stars for the occasional home-run, amazing shot. Anything that doesn’t qualify as three to five stars I just leave unrated so that I can filter them out later.
When it comes time to pick images for a design, I simply filter my view in Bridge to four stars and above and browse through just the top images. If I ever need a different variation of an image, I switch the filter to three stars and search through the runner-up photos surrounding my pick to find what I need.

Color labels are great for when there’s an additional meaning I want to attach to some photos. For instance, if I want to make sure no photos are used twice across multiple designs and mediums then I would label each photo I use by a specific color per asset as a visual reminder. Or if I want to remember to edit certain photos, then I might label them a specific color and remove the label from each one once I’m finished.

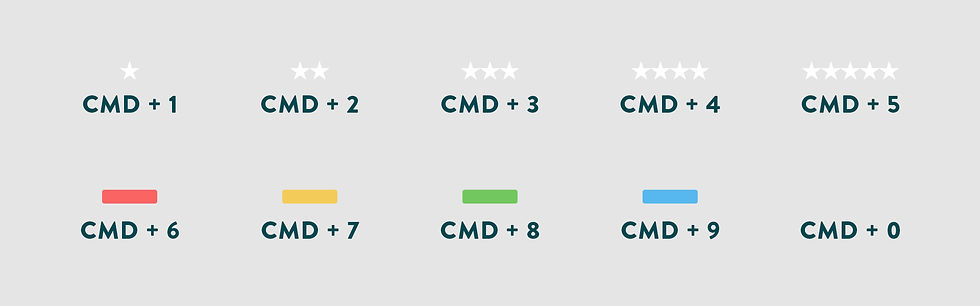
How to assign a star rating: CMD + # (1-5)
Select the image and hit CMD + # (1-5), the number being the level you want to assign to that file or folder, for example: CMD+4 for four stars
How to assign a color label: CMD + # (6-9)
Select the image and hit CMD + # (6-9), the number being the color you want to assign to that file or folder, for example: CMD+6 for a red label
Or you can do it the long way by right clicking the file and selecting the color you want from the menu (this is especially helpful if you have a hard time remembering which number goes to which color).
CMD+0 erases all stars a color labels assigned to a file
4. Head straight into Photoshop
Ready to edit your selection? Simply double click your photo(s) or hit Enter to take them straight into Photoshop. No right clicking or searching for apps. Just one click and you’re all ready to go.

Bridge is like a chainsaw to Finder’s butter knife; great for heavy users, but overkill for those with just a few images. But for designers and photographers with large folders of images, Bridge can be a tremendous time saver.


